How to Fix Low Water Pressure In Your Home

Water pressure impacts many of our daily tasks, including showering, washing dishes, gardening, and doing laundry. Low water pressure occurs when the flow of water through pipes and fixtures is weaker than usual. Showering or washing our hands are perhaps the activities where we most notice low water pressure, as we directly feel the difference. Below we’re covering the most common reasons for low water pressure in your home, and how to correct them!

Causes & Fixes

Low water pressure can stem from a number of sources, including:

Municipal Water Supply Issues

Scheduled maintenance, high demand, and water main breaks are all potential causes for low water pressure within a city or county’s water lines. While there’s not much you can do to personally fix a problem with your city or county’s water supply system, you can play a big role in documenting the issue and alerting those who can.

How to fix it:

  • Ask your neighbors if they are experiencing any issues with low water pressure. If multiple homes are affected, it’s likely related to the city’s water line.
  • Contact the local Water Authority to see if there is any maintenance taking place that might be affecting your supply. Also let them know of your specific issues. If other homeowners report the same issues, they’ll know that there could be a larger issue to look into.

Faulty Fixtures

A damaged or clogged shower head, faucet or appliance is the first thing we’d suggest checking, especially if low water pressure appears to be isolated to a specific area of your home.

How to fix it:

  • First, turn off the main water supply to your home.
  • Check the affected appliances for build-up or debris. In the case of a faucet, you can simply unscrew the aerator at the tip of the faucet. Showerheads should be fully detached from the water pipe.
  • While the appliances are detached, you may want to check the water supply to determine if the fixtures were in fact the issue.
  • To clean, soak the showerhead or aerator in vinegar and brush off any visible debris.
  • Reattach the fixtures and check the water pressure again. If it is still low, there is likely a deeper issue at hand, which can be determined by a professional plumber.

Pipe Obstructions

Mineral deposits, rust or other debris within water pipes can lead to blockages or corrosion over time.

How to fix it:

When you think of a clog, you probably think of a drain clog. While there are many DIY solutions to clearing a drain, clogs in a water pipe will almost always require the help of a professional plumber. A plumber will be able to locate the affected pipe and clean out any debris or mineral deposit buildup.

In severe cases, the pipe may need to be replaced. Your plumber might also recommend a water softening system to remove the minerals from your home’s water supply that can contribute to pipe blockages over time.

Plumbing Leak

Undetected water line leaks can divert water away from your residential pipes, reducing the water pressure in your fixtures.

How to fix it:

Fixing a leak will likely require a professional plumber. Below are our top ways to identify the leak prior to doing so, which can save your plumber some time – and you, some money.

  • Check your water meter by turning off all water sources and monitoring the meter for any movement, which could be a clear indicator of a potential leak.
  • Check all visible pipes for signs of leaking, including water stains, active dripping or damp spots around the pipe.
  • Inspect fixtures, including faucets and showerheads, for any drips.
  • Test the pressure but recording the pressure with the main water valve shut off. Leave off for a few hours and test again. A significant drop in pressure is a clear sign of a leak.

A Malfunctioning Water Pressure Regulator

A water pressure regulator controls the pressure of water incoming from the municipal supply line. If set incorrectly or malfunctioning, it can lead to low water pressure in your home.

How to fix it:

  • Turn off the main water supply to prevent any water flow while adjusting
  • Find the water pressure regulator, which should be located near the main water supply valve
  • Access the regulator’s adjustment nut, typically found on top of the regulator
  • Adjust the pressure setting with a wrench, turning the adjustment nut clockwise to increase pressure or counterclockwise to decrease it.
  • Check the water pressure at regular intervals during the process, turning the main water supply on and off as you measure each adjustment

Water Pressure Repair in Northern Virginia

Need help identifying the cause of low water pressure or repairing the issue? Our highly trained experts at Kiddco Plumbing have decades of experience addressing water line obstructions, leaks, and faulty plumbing fixtures. For 24/7 plumbing service, or any Northern Virginia emergency plumbing needs, call us at 703-435-4441.

Unclog Your Shower Drain Fast

Dealing with a pesky clogged drain? Not to worry, we’ve got you covered! While we’re always going to suggest seeking the help of a professional plumber, there are several methods you can safely try at home for a temporary fix, which we’re outlining below.

Symptoms of a Clogged Shower Drain

It’s important to heed the early warning signs of a clog to avoid more significant plumbing problems down the line.

The most common signs that your shower drain may be clogged include:

1. Slow Drainage

If water is taking longer than usual to disappear down the drain, you most likely have a blockage that is preventing the flow.

2. Gurgling Noises

When air gets trapped in the drain due to an obstruction, you may hear gurgling noises when running the water – an early warning sign of a developing clog.

3. Standing Water

Finished showering, but still seeing water at the base? This is a clear sign of a clog. And what’s worse is that you now have a breeding ground for bacteria if it sits for too long.

4. Foul Odors

Experiencing unpleasant odors from your drain? A drain clog can trap hair, soap scum, and dirt, causing bacterial growth over time.

What You Need to Unclog Your Shower Drain

Depending on the method you choose, below are the most common tools needed for unclogging a shower drain:

  • Rubber gloves
  • Needle nose pliers
  • Boiling water
  • Baking soda and vinegar
  • Plunger
  • Towel
  • Bucket for removing standing water

Steps to Unclogging the Shower Drain

First and foremost, we do have to caution you against using a commercial liquid drain cleaner. These products contain chemicals that can not only cause harm if they splash on you, but can also severely harm your pipes – which can be a very costly problem down the road.

While your best bet will always be to hire a professional plumber, there are a few DIY methods you can safely try at home for a temporary fix, including:

Manually

Yes, it sounds a bit messy — you’ll want to wear gloves — but you may be able to remove any debris with your hands. Simply remove the drain cover and use pliers to pull out visible hair, soap scum or other debris.

Boiling Water

Important note: Do NOT pour boiling water into the drain if you have PVC pipes!

If your clog is caused primarily by soap scum, boiling water may do the trick, as it will liquify the soap and flush it down the drain. After allowing any standing water to drain. It should be noted that if water still remains after 45-60 minutes, the clog is probably too large to be cleared with boiling water.

Baking Soda and Vinegar

If boiling water doesn’t do the trick, you can try a combination of baking soda and vinegar, which could break up the debris. Pour 1/2 cup of baking soda down the drain followed by 1/2 cup of vinegar, then close the drain. If this solves the problem, it should happen within 30-45 minutes. Follow up with boiling water to flush out the loosened clog. But again, do NOT pour boiling water into the drain if you have PVC pipes!

A Plunger

If the above solutions don’t work, you can try a plunger. Once all standing water has drained or been removed, fill the shower with just enough water to cover the bottom of the plunger. Plunge 5-10 times to remove the clog. If this doesn’t work, you can try 2-3 more times.

A Professional Plumber

You knew this would be our final suggestion! Look, you don’t know what’s going on in your drain pipes — and it could be a much bigger problem than you think. While DIY methods can work for minor clogs, persistent or recurring issues will require a professional plumber who can diagnose and resolve the problem.

If you’ve tried the above drain unclogging methods and are still experiencing issues, your best bet is to contact a professional. In addition to drain cleaning and clog removal, we can also conduct a drain camera inspection to help identify the source of the clog.

Drain Cleaning in Northern Virginia

If you’ve been experiencing issues with your shower or tub drain, our plumbing experts are ready to help! It’s important to note that DIY methods for clearing drain clogs will only target issues closest to the drain, and may not be sufficient for more complex issues within your plumbing system. Be sure to schedule regular drain cleanings – we recommend every two years – to keep your pipes healthy and clear!

The History of Indoor Plumbing

Plumbing is an integral – and often underrated! – part of our daily lives, giving us clean water for drinking, bathing, and waste removal. Ever wonder who “invented” it? Below is a rundown of significant timestamps in the development of our modern day plumbing system.

Ancient Beginnings

While its early beginnings are certainly nothing like what we have today, plumbing can be traced back as early as 2600 BC, when the Indus Valley Civilization in Southeast Asia built the first documented system of pipes carrying water from one place to another. This system included wells, floor drains, and even septic tanks! It is also widely accepted that the Egyptians began using copper pipes for sewage and water supply around this same time.

By 2000 BC, China had developed a pipeline using hollow bamboo reeds to transport fresh water and natural gas.

Late Bronze Age Advancements

Around 1500 BC, bathrooms with hot and cold running water could be found on the island of Crete, in the palace of the Minoan King. The bathrooms also featured ceramic bathtubs and a toilet with a drainage system.

During this era, the Egyptians also created the first copper plumbing pipes. It would take nearly 3,500 years – the early 1940’s – for copper to become the most used material for plumbing in the developed world.

Innovations in Rome

In the first century BC (100 BC), the Romans were the first to use lead pipes to bring water from the mountains into private homes – more specifically, the private homes of aristocrats.

Around this time, public bathhouses also began to pop up, featuring elaborate steam rooms and wastewater systems. Many of these bathhouses are still in use today!

While many civilizations can claim that they invented our modern system of plumbing, the word itself comes from the Latin word “plumbum,” which means “lead,” a nod to the lead pipe systems developed by the Romans.

The Plumbing Renaissance (and Birth of the Toilet)

The Renaissance was a time of rebirth, bringing forth a revival of learning and wisdom. During this era, there were great advancements in almost every area of life, and plumbing was no exception. This is due to renewed interest in hygiene and public health, leading to several advancements in water and sewage systems.

Perhaps one of the biggest advancements for plumbing was the invention of the flushing toilet by Sir John Harington in 1596. (Fun fact: Ever wonder why a toilet is called “The John”? Now you know!) He gifted it to his godmother, Queen Elizabeth I.

Harington’s toilet had a 2-foot-deep oval bowl, fed by water from an upstairs cistern. It did require 7.5 gallons of water to flush it though, which could be an issue when water was scarce!

The Advent of the Modern Shower

The concept of showering has been around since the beginning of time – well, as far as we know! – using outdoor waterfalls and buckets of water. In 1767, the first patent for a mechanized shower was granted to William Feetham, a London stove maker. His shower design was powered by a hand pump, using much less water than a bath.

In 1810, an anonymous entrepreneur invented the English Regency Shower, which pumped water continuously from a lower basin to a cistern directly above the bathers head. It should be noted that they were being “cleaned” by the same water than they had previously rinsed in.

By 1850, advancements in plumbing allowed bathers to not have to rinse off in the same wastewater.

Still, showers were considered a novelty, and only used by the elite. The use of showers would not become mainstream until the 1930’s.

Municipal Water Supplies

The early priority for the development of water systems in American cities was firefighting. In 1795, wooden pipelines were built in New York City to carry water for firemen through hollow logs of wood. When needed, they would have to drill through the pipes, and plug the hole when they were finished.

By 1815, the City of Philadelphia was among the first to create a government-issued safe water supply for its residents, powered by steam turbines to draw water from the Schuylkill River.

It wasn’t until the late 1800’s and early 1900’s that other cities followed suit, mostly in response to rapid population growth. When shallow wells and small reservoirs became inadequate for serving their residents, US cities began to plan for safe water supply (and sewage!) systems.

The Iron Age of Plumbing

The increase in modern municipal plumbing systems in the late 1800’s created better living conditions in cities, helping to ward off the spread of common diseases at the time, including cholera. Also during this time, cast iron pipes slowly began to replace lead as the standard for pipes in water distribution systems. While cast iron is rarely used in new construction homes these days, many homes built in the earlier part of the 1900’s may still feature cast iron pipes.

Around 1980, builders and plumbers began replacing cast iron with PVC (Polyvinyl Chloride Plastic). It has a number of advantages, including being easier to make, more durable than other options, and much less expensive than cast iron and other materials.

The Digital Age of Plumbing

Much like with every other area of our lives, plumbing has seen a number of digital advancements. Many homeowners now use “smart plumbing systems”, allowing them to monitor water usage, detect leaks, and control fixtures remotely through an app on their smartphone. In addition to the convenience these systems provide, they are also helping homeowners conserve water and increase efficiency.

Plumbing has certainly come a long way since the early days of the Romans and Egyptians. The ingenuity and efforts of our predecessors have vastly improved public health, and most certainly, our quality of life! We have no doubt that we’ll see many more innovations in plumbing in our lifetime!

Help! My Bathtub Faucet is Leaking!

A leaking bathtub faucet, while seemingly harmless, can be a sign of a much larger plumbing issue. A faucet leak can waste up to 90 gallons of water per day, in addition to causing a considerable increase in your water bill.

Below, we’re breaking down some of the most common causes for a leaking bathtub faucet – and how to fix it.

Causes of Leaking Bathtub Faucets

The most common causes of leaky bathtub faucets include:

Worn Out Washer

A worn out washer is one of the most common causes of a leaking bathtub faucet. Located inside of the faucet handle, the rubber washer creates a watertight seal. Over time, this washer can deteriorate, causing a steady drip.

High Water Pressure

When water flows through pipes at an excessive pressure, it puts a great amount of stress on plumbing components – including the bathtub faucet. High water pressure can lead to leaks in parts of the faucet, including the handle and spout, along with many other issues within your plumbing system! Installing a pressure regulator can help prevent leaks caused by high water pressure.

Improper Installation

Oftentimes, a leaking bathtub faucet is the result of an improper installation. If faucet components aren’t properly assembled or tightened, leaks are often inevitable. Bottom line: Don’t try to cut corners by installing a faucet yourself. It could cost you more in the long run!

Hard Water Buildup

Hard water contains a high concentration of minerals – calcium and magnesium – that can accumulate and create obstructions within the plumbing system. Over time, these blockages can impact the functioning of the faucet components, ultimately leading to leaks.

Corroded Valve Seat

The valve seat on your bathtub faucet creates a seal between the faucet and the spout, ensuring a water-tight closure when the faucet is off. Over time, the valve seat can become corroded due to mineral deposits or water impurities, leading to leaks around the spout area.

How to Fix a Leaking Bathtub Faucet

If your leaky bathtub faucet is due to worn out faucet components, you can try replacing those components to remedy the leak, using the steps below:

1. Grab the Following Supplies:

  • Adjustable wrench
  • Screwdriver
  • Replacement components
    • Common components in need of replacing include washers, O-ring,s and cartridges
  • Plumber’s tape
  • A towel for any spills

2. Shut Off the Water

Turn off the water at the shut-off valve near the bathtub or at the main water supply.

3. Remove Faucet Handle

Remove with a screwdriver or wrench, depending on faucet type. The screw is located under the decorative faucet cover or cap.

4. Replace any Worn Components

Check the washers, O-rings, and cartridges for signs of wear and tear, and replace any worn components with new ones. It’s helpful to compare with your new replacement parts – this will make any cracks or damage more apparent.

5. Create a Water-Tight Seal

Wrap plumber’s tape around the connections to ensure a tight seal, preventing any additional leaks.

6. Reassemble the Faucet

Securely put the faucet handle back in place, ensuring it’s in alignment and that screws are properly tightened.

7. Turn On Water Supply

Slowly turn on the main water supply. If you see any immediate drips or leaks, quickly turn the water supply off and recheck your connections (or better yet, call a plumber!)

8. Test Your New Faucet Connections

Slowly turn the faucet on to be sure it’s working properly. Turn off and wait a few moments to ensure any leaks or drips are gone.

If you’re unsure of the cause of the leaky faucet, or want to ensure it’s remedied with the utmost precision and care, we highly recommend contacting an expert plumbing professional. And if you are in Northern Virginia, we certainly hope it is us!

Faucet Repair in Northern Virginia

Need help repairing a faucet, or installing a new one? Our highly trained experts at Kiddco Plumbing have decades of experience installing and repairing faucets. For 24/7 service for faucets, or any Northern Virginia emergency plumbing needs, call us at 703-435-4441.

How Do I Know There’s a Gas Leak in My Home?

How Do I Know There’s a Gas Leak in My Home?

A metal pipe with a gas leak coming out the top

Many homes have at least one or two appliances running on natural gas, including furnaces, oven ranges, and water heaters. While natural gas explosions are rare, they do occur. Gas line leak detection and repair are critical at the first sign of a gas leak.

What is a Gas Leak?

A gas leak occurs when gas escapes from a pipe or connection. They are extremely dangerous, with the potential to harm home occupants, pets, the home, and the environment.

How Does a Gas Leak Occur?

Gas leaks can occur in many places in the home, but the most common are where pipes join together at the fittings. The most common causes of gas leaks are corrosion, and poor piping.

Gas Leak Symptoms

Gas leaks are especially dangerous – and potentially life threatening – and require immediate attention to ensure everyone’s safety. Knowing the signs of a leak can help you act quickly!

Common signs of a gas leak include:

Smell of Rotten Eggs

While natural gas is odorless, gas companies add a chemical, ethyl mercaptan, which produces a sulfurous, or rotten egg, smell. This is specifically designed to help detect leaks.

Hissing Sounds

Hissing coming from gas lines or gas appliances can occur as gas escapes from a damaged pipe or connection.

Physical Symptoms

Sudden dizziness, headaches, nausea or fatigue could be signs of exposure to gas, especially if these symptoms disappear once you leave the affected area.

Pilot Lights Going Out

A pilot light going out frequently could be a sign of a leak impacting the flame.

Unexplained Increase in Gas Bill

If your gas bill increases without any obvious change in usage, you may be wasting gas due to a leak.

What to do if There’s a Gas Leak

If you suspect a gas leak, it’s important to act quickly, taking the following steps:

Evacuate Your Home

Leave the premises and ensure everyone else does too. Avoid using any electronic devices or switches, as sparks could ignite the gas.

Do Not Use Flames or Ignite Anything

Don’t do anything that could cause a spark inside your home, including using the telephone, flipping switches or unplugging any appliances.

Open Windows and Doors (from the outside!)

This will allow fresh air to circulate.

Turn off the Gas Supply

Shut off the gas supply at the main shut-off valve, which is usually located outside.

Call 9-1-1

Contact Emergency Services right away – from outside the building. Your gas company will have an emergency line, and the fire department should also be contacted. Once emergency services have been contacted, you can contact the gas leak repair experts at Kiddco Plumbing.

Stay Outside

Don’t re-enter your home until emergency personnel have given you the go-ahead to go back inside.

Gas Leak Repair in Northern Virginia

Suspect a gas leak or need help with maintenance of your lines? Our 24/7 gas leak repair experts can help! We are licensed, insured and certified to handle it all! Check out our client testimonials and request a service appointment to receive a prompt response from your friendly neighborhood gas leak repair experts.

Boiler vs. Furnace: Pros and Cons

Boiler vs. Furnace: Pros and Cons

When it comes to heating your home, there are two popular options: boilers and furnaces. While each has its unique advantages, it’s their way of delivering heat that is the primary distinction between the two. Below, we’re highlighting the pros and cons of each to help you make the best decision for your home setup, heating needs, and budget.

How Does a Boiler Work?

Boilers use heated water or steam to distribute heat and provide hot water throughout the home, delivering it through radiators, baseboard heaters, in-floor systems, and water faucets. Because it both heats the home and delivers hot water, it combines the functions of both a water heater and a furnace.

A boiler is connected to the home’s natural gas supply. When your thermostat triggers a new heating cycle – or you turn on a hot water faucet – the fuel is burned within a combustion chamber to generate heat. The heat transfers to the water within the boiler to then be circulated throughout your home.

Boiler Pros and Cons

Boilers do not require ductwork, which gives them several distinct advantages over furnaces, including:

Energy Efficiency

Air ducts are known to lead to heat loss. Because boilers don’t require ductwork, they provide more precise temperature control and even heat distribution. They also allow for zoning, letting you heat different areas of your home independently, meaning you won’t waste energy on unused parts of your home. Both of these factors keep energy consumption – and utility bills! – much lower.

Consistent Heat Distribution

Boilers provide radiant heat, which produces a steady distribution of warmth throughout the home – no cold or hot spots!

Built to Last

Boilers require fewer parts than furnaces and will typically require less maintenance and last longer than a furnace, with an average lifespan of 15 years.

Additional advantages include smaller size, easier installation, silent operation, and less dust and allergens.

Disadvantages of a boiler versus a furnace include:

Installation Costs

Because boiler installation involves heavy plumbing work to integrate it with the heat distribution system, they often have a higher upfront cost than furnaces. While this is typically offset over time by the associated energy savings, it could make a difference if you’re not sure you will be in the home long enough to see that offset.

Maintenance

It’s important to maintain a regular schedule of inspections and cleaning to ensure optimal performance over time.

Limited Cooling Options

Boilers are strictly for your heating needs, and will require investing in a separate air conditioning system.

Slower to Heat

Because it takes time to heat water or steam to the desired temperature, a boiler doesn’t heat a home as quickly as a furnace does.

How Does a Furnace Work?

A furnace uses forced air to distribute heat through your home, through ductwork and vents. The fuel burns to generate heat within the unit’s burner before passing through a heat exchanger. Air from the ductwork is then blown over the exchanger to warm the air before it is forced into the ductwork through the furnace’s blower.

Furnace Pros and Cons

Furnaces have several distinct advantages over boilers, including:

Lower Initial Cost

Because furnace installation is simpler than that of a boiler, the initial costs to set up the system are often lower.

Cooling Options

Furnaces can be integrated with a home’s air conditioning system to allow for year-round heating and cooling functionality within a single system.

Versatility

A furnace heating system can be powered by electricity, natural gas, or oil, providing flexibility based on your location and energy availability and costs.

Disadvantages of a furnace versus a boiler include:

Less Efficiency

Heat loss is a common concern of a forced air distribution system, especially if ducts become leaky over time.

Inconsistent Heating

Forced air systems make it difficult to keep temperatures consistent across different areas of a home. Rooms could be cooler or warmer than others based on their distance from the furnace.

Air Quality

Dust and allergens can build up in ductwork, and circulated throughout a home when the furnace is running. Regular cleaning of ducts will be required to lessen this occurrence.

Comparing Boilers and Furnaces

When deciding between a boiler or furnace for your home heating needs, it’s important to consider fuel availability, installation costs, and maintenance requirements. Your unique needs and budget will be the key to determining whether a furnace or boiler is the right fit for you and your home.

Boiler Installation and Repair in Northern Virginia

Need a boiler system installed or repaired? Our highly trained experts at Kiddco Plumbing have decades of experience installing and repairing boilers and are familiar with all of the leading boiler manufacturers. For 24/7 service for boilers, or any Northern Virginia emergency plumbing needs, call us at 703-435-4441.

How Does a Water Softener Work?

What is a Water Softener?

A water softener is a device that, simply and perhaps obviously put, softens the water in your plumbing system. When water is in the ground, it picks up minerals as it passes through rocks and soil. High concentrations of these minerals harden the water that will now enter your plumbing system.

Calcium and magnesium are of the biggest concern, as they can greatly impact the functionality of water in your home. A water softening system can remove these minerals from your home’s water supply.

Why Would a Water Softener be Needed?

Hard water creates limescale, a chalky substance that attaches to surfaces it comes into contact with. This brings with it a number of negative effects to both you and your home.

Our top reasons to install a water softening system:

1. Hard water can damage your home’s plumbing and water heating systems.

Over time, these deposits of limescale can create blockages in your plumbing system, which reduce the flow of water to your water taps and appliances. This buildup can also reduce the efficiency of your water heating system by up to 50%!

2. Hard water lessens the effectiveness of your cleaning products.

Soap will not completely dissolve when it comes into contact with hard water. Instead, it leaves behind a residue, resulting in either more soap being required to effectively clean a surface, or a surface never actually getting 100% clean. This occurs with both home cleaning products as well as skin and hair care products. If your hair has ever felt dull or lifeless after shampooing, hard water could very well be the culprit! A water softener can bring forth cleaner dishes, softer laundry, and livelier skin and hair!

3. Hard water can worsen skin conditions.

Hard water is known to aggravate eczema and other dry skin conditions. This is due to both the extra cleaning product needed to effectively clean skin, as well as soap scum that develops on skin and clothing washed in hard water.

4. Soft water saves you money on cleaning.

Because soft water is more effective at cleaning than hard water, you can wash yourself or items in your home at lower temperatures, for less time, and with less cleaning product. You’ll save money through less energy consumption, lower utility bills, and lower cleaning product expenses. When you think about how often you wash your clothes, dishes, car, and yourself, the cost savings can really add up!

How Does a Water Softener Work?

When hard water enters through a main water pipe, it will then pass to the water softening system, which includes a resin tank. Through a process called ion exchange, resin beads within the tank will attract and hold onto the hard water minerals, pulling them out of the water. This leaves behind soft water, which will now leave the tank and be readily accessible for your home plumbing needs.

Water softeners will typically need to be replaced every 20 years, depending on the quality of the system and its maintenance over time.

Worried that you may have already done damage with years of hard water in your plumbing system? Rest assured that a retroactively installed water softener will go to work dissolving already existing limescale deposits in your water system.

Water Softener Repair in Loudoun County, VA

Need help installing a new water softening system or need maintenance on your current system? Our plumbers are licensed, insured and certified to handle it all! From routine maintenance to repairs, replacements and upgrades, our work speaks for itself. Check out our client testimonials and request a service appointmentto receive a prompt response from your friendly neighborhood water softener experts.

Why is My Garbage Disposal Not Working?

My Garbage Disposal Isn’t Working!

Once you have a garbage disposal, you feel as if you could never live without one again! Dinner cleanup is easier, you prevent clogged pipes and your garbage doesn’t get stinky with rotting food. Plus, disposals are good for the environment! Because food is ground up into tiny pieces, you eliminate the amount of waste that ends up in landfills.

How to Maintain your Garbage Disposal

As useful as they are, garbage disposals do require maintenance and are only expected to last about ten years. To keep yours working hard for you every day, practice these maintenance tips:

  1. Once a month, run a cup of ice through your disposal to keep blades sharp.
  2. Be sure you are using your unit regularly to avoid corrosion.
  3. Only use cold water to flush food as hot water can cause grease to stick to your pipes.
  4. Don’t overload it.
  5. Avoid foods like coffee grounds, banana peels, bones, egg shells, onion and garlic skins, and expandable, starchy foods like pasta, rice and potato peels.

Why My Garbage Disposal Isn’t Working

Has your disposal stopped working or is acting strangely? Here are the top seven reasons why your garbage disposal may be on the fritz:

  1. My garbage disposal won’t turn on

    If there are no sounds or activity, this usually indicates that there is an electrical issue preventing current from getting to the disposal.

  2. My garbage disposal won’t turn off

    In this case, your starter switch has probably shorted out and needs to be replaced.

  3. My garbage disposal is humming, but is not operational

    This most likely means your impeller plate (the rotating part of the disposal that the blades are attached to) is being prevented from turning. Be sure to turn your garbage disposal off quickly when you see this issue as it can burn out the motor.

  4. My garbage disposal is leaking from the top

    Over time, the vibrations from the grinding can loosen the flange that connects your disposal to your sink. When this seal isn’t tight it causes leaking.

  5. My garbage disposal is leaking from the bottom

    A leak from the bottom of your unit can indicate there is a failed internal seal or the shell of your disposal has cracked.

  6. My garbage disposal is clogged

    If your sink is full of water, that means something is in your disposal that shouldn’t be. Too much food, the wrong kinds of food or a foreign item like a fork can all cause clogs.

  7. My garbage disposal stinks

    Your unit may still be working, but it sure makes it unpleasant to do the dishes! This is caused by rotting food that didn’t get flushed through the system.

How to Fix a Garbage Disposal

If you attempt to fix your garbage disposal on your own, please be careful! Before you even inspect your disposal, be sure you have unplugged it. And never, ever put your hands down the drain. A broken disposal could start working at any time.

OK, now that we are sure you will complete the project with all your fingers attached, here are a few fairly-simple ways to troubleshoot and, hopefully, fix your garbage disposal:

  1. Push the reset button

    Sometimes this is all it takes! The button is usually on the bottom of your unit. Your disposal does have to be plugged in for this to work.

  2. Check your electrical panel

    Be sure the circuit breaker hasn’t tripped. Flip it back if it has.

  3. Check your outlet

    Plug another powered device into the same outlet to see if it works. If it doesn’t, you know the problem is not with your garbage disposal.

  4. Rotate your impeller plate

    Insert a garbage disposal wrench into the hole at the bottom of your unit. Turn it clockwise to free the stuck impeller.

  5. Remove the clog

    Check out our clog blog, for step by step instructions on how to do this.

  6. Kill stinky bacteria

    Using baking soda and white vinegar, dish soap, Borax or even mouthwash, pour a generous amount of cleaning liquid down the drain and let it sit. Then let fresh, cold water flow through.

Garbage Disposal Repair in Loudoun County, Virginia

If you are still stumped on how to fix your garbage disposal, it may be time to call the professionals! Kiddco Plumbing is at your service to repair or replace your disposal. Give us a call for a quote today: (703) 435-4441

How Long Do Water Heaters Last?

On average, water heaters last roughly 8 to 15 years. Depending on the brand and type, some last up to 25 years! Their lifespan varies greatly based on several factors including hot water heater brand, type of water heater, adherence to a routine maintenance schedule, temperature settings, and more.

Factors Influencing How Long Water Heaters Last

Hardness of Water

Hard water is attributed to calcium and magnesium dissolved into a water supply. While these minerals make water taste unpleasant, they are safe to drink and bathe in. However, hard water leads to mineral deposits in your water heater causing clogged pipes, burnout of the water heater bottom, or scale formation in tankless heaters.

For this reason, hard water is notorious for destroying plumbing systems, causing water heater functionality issues and decreasing the service life of your unit. Check out EcoPure’s study on hard water levels to see if your local area has a hard water problem.

Frequency of Use & Temperature Settings

It should go without saying but the more you use it, the faster you lose it. Water heaters last longer when temperatures are set to the minimum level bearable. If your shower is scalding and unbearable when turned to the hottest setting, you can extend your water heater’s life by lowering its temperature threshold.

Likewise, if you and your family take frequent and/or long showers or if your commercial plumbing system uses hot water for an extended period of time, you may see a decline in its lifespan. Use your hot water as needed but note that the more it’s used and the hotter it is, the earlier you may need a replacement.

Location of the Unit

Crawl spaces and garages are convenient and are common places for plumbers to install hot water heaters. However, these common locations force the heating element to work harder to regulate the water temperature compared to the outdoor temperature during colder months.

Forcing it to work harder by installing a heater in a garage or crawl space will decrease the life of your unit. When Kiddco Plumbing clients install a new water heater, we suggest opting for an indoor location like a utility closet or a basement to extend its lifespan. Nonetheless, some water heater brands and types tend to last longer than others.

Type of Water Heater & How Long They Last

Tankless (or On-Demand)

Tankless water heaters, both electric and gas, are more energy-efficient than traditional storage tank heaters. Additionally, these units last longer than other types of water heaters coming in at an average of 20 years.

Storage Tank Heaters

This is the most common type of water heater with units powered by both natural gas and electricity and models varying greatly. Nonetheless, storage water heaters last an average of 8 to 12 years.

Heat Pump (or Hybrid)

Heat pump water heaters capture hot air surrounding the unit and transfer it heat to the water inside. Using 60% less energy than a traditional unit, this type of water heater boasts an average lifespan of 13 to 15 years.

Solar

Solar-powered water heaters attach to the roof of a home or business to capture energy from the sun which heats water naturally and efficiently. These units can be expensive and typically last an average of 10 to 20 years.

Condensing Water Heaters

Like others, this type of water heater is extremely energy-efficient and up to 95% more effective at heating water than other types. However, they don’t tend to last quite as long with an average lifespan or 10 to 15 years.

Water Heater Brands & How Long They Last

Depending on model design and the manufacturing process, water heater life expectancy is variable. Additionally, the type of water heater along with the factors previously discussed all affect lifespan. Below you will find how long water heaters last based on popular brands.

A.O. Smith

Warranties on A.O. Smith water heaters last roughly 6 to 12 years meaning this brand may persevere up to 24 years with regular maintenance and checkups.

General Electric

On average, GE gas heaters last an average of 8 to 12 years and electric heaters last anywhere from 10 to 15 years.

Kenmore

In our experience, the common cause for a Kenmore water heater replacement is due to a leak in the tank. However, this brand is known to last anywhere from 18 to 30 years with regular maintenance. On average, Kenmore brand heaters last 10 to 12 years.

Rheem

Rheem water heaters typically last anywhere from 5 to 10 years but on a 5-year maintenance and cleaning schedule, they may last up to 15 years. Do you have a Rheem unit that hasn’t been serviced recently? Contact Kiddco Plumbing for an estimate.

Signs That it’s Time to Replace Your Unit

  1. Weird Sounds

    Those rumbling, rattling and gurgling sounds coming from your basement or utility closet aren’t a monster, it’s your water heater. If your unit is producing strange sounds, it may be time to schedule a licensed and insured plumber to inspect.

  2. Funky Smells & Colors

    Hot water that tastes metallic or has a reddish or yellow tint indicates that the inside of your unit is likely rusted. Likewise, when tanks are exposed to the air via a leak they are susceptible to bacteria. As a general rule, when hot water is discolored or smells unpleasant, it’s time to call a plumber.

  3. Water Pooling

    Water pooling at the base of your unit is a clear sign that a water heater repair or replacement is imminent.

  4. Limited Hot Water

    Does your water get cold mid-shower? If so, you may need to reach out to a certified plumber to discuss your options. Oftentimes, limited hot water can be fixed with a repair and new water heater replacement parts. However, if the source of the problem is ignored, you may end up needing a replacement.

Water Heater Replacement Service Tips

When you spot the warning signs of a water heater nearing the end of its life, here are a few things you should know about getting a replacement unit.

  • Explore options – With endless brands, models and types of units, finding the right water heater can be a chore. Consider your hot water usage needs, the location of the unit, and how your unit will be powered (electric, solar or natural gas). Need help making an informed decision? Kiddco Plumbing is happy to help!
  • Lead times – Always consider how long it will take a water heater to arrive after placing an order. Calling the manufacturer is a great way to find out lead times but a qualified water heater plumber should be happy to do this for you.
  • Size – Finding a properly sized water heater requires consideration of the residence or commercial building’s needs. Check out this article by the U.S. Department of Energy for more information on sizing your new water heater.

Water Heater Repairs in Sterling, Virginia

Our plumbers are licensed, insured and certified to handle all things water heaters. From routine maintenance to repairs, replacements and upgrades, our work speaks for itself. Check out our client testimonials and request a service appointment to receive a prompt response from our friendly neighborhood water heater plumbers.

Water Service Lines: Everything You Need to Know

Introduction to Water Service Lines

All thriving communities need a clean, reliable water supply. In some instances – such as in more rural areas – that comes from well water. But it’s more likely that your home’s or business’s water supply comes via water service lines underground.

From the inner workings and cost of water line repair and replacement to how to identify a lead pipe, we’re going to lead you through everything that you need to know about water service lines.

What is a Water Service Line?

Water service lines are the piping that carries water from the city’s public water supply in the underground water mains outside of your property directly to the plumbing fixtures inside of your property.

Who is Responsible for the Water Line From the Street to Your House?

Water service lines within the bounds of your property are considered your personal responsibility to maintain, while public water pipes outside of private property lines are the city’s responsibility. This means that the homeowner is responsible for all of the water lines running from their property to the street.

What is a Water Main?

The water main is a large underground pipe that serves as the main pipe for a city or town’s water distribution system. Smaller distribution lines are connected to the water main that carry water directly to people’s homes and businesses.

What Do Lead Pipes Look Like?

Rusted led pipes in a junk pile
Lead pipes are the single biggest threat when it comes to public lead consumption. When water transfers through lead pipes, particles of lead seep into the water supply. Lead is entirely unsafe to drink, making this a serious hazard.

While lead pipes have been phased out in many places, there are still some locations that use older lead pipes, putting the people there at risk.

Lead pipes have a dark gray color. An easy way to find out if your water pipes are lead is to take a coin and scrape it against the surface of the pipe. If the surface underneath is a shiny silver color, your pipe is lead.

When Were Lead Pipes Banned?

The 1986 Safe Water Act Lead Ban made it against regulations to use lead piping in the construction of any residential or non-residential plumbing system in which the water was meant for public consumption. In 1998, it became illegal to sell plumbing fixtures that were not “lead-free” (defined as having less than 8% lead)

If your plumbing fixtures have not been replaced or repaired since 1986, there is a chance that you have lead pipes, which could pose a danger to you, your family, and/or your business.

What Does a Water Service Line Replacement Entail?

If you have water leaking from your pipes, you’re experiencing low water pressure, your water bill has gotten unexplainably more expensive, or if your pipes are made from lead, it’s time to get your water service lines replaced.

Here’s what you can expect during a water service line replacement:

NOTE: Since digging is involved in this process, we highly recommend you call a trained professional so you do not destroy your plumbing fixtures or your property in the process.

  1. Locate & Mark

    Since this process involves digging, it’s crucial that we’re able to locate where all of the important points are before we begin that process. This includes locating the water main and where it connects to your personal water lines (also known as the curb stop), as well as locating the existing water lines themselves.

    We’ll also need to mark any other underground utilities such as fiber optic cable lines, as well as other underground masses we’ll need to account for.

  2. Shut Off Water

    The next thing we’ll do during a water line replacement is shut off the water supply. This is an obvious step taken before any plumbing repair or replacement service to reduce mess.

  3. Dig

    At this stage we’ll carve out a hole near the spot where the main connects to your personal water line. We’ll need to repeat this process for any piece of the water line that we’re attempting to replace.

  4. Replace

    We’ll remove your old pipes and replace them with new ones. During this process, we’ll also insulate your new piping to protect it against freezing in the future.

  5. Finish

    Once the old piping has been removed and the new pipes have been properly installed and connected, we’ll fill in the holes that we’ve dug on your property and turn the water supply back on so you can use your plumbing fixtures once again.

How Much Does Water Service Line Replacement Cost?

In the state of Virginia, the average water service line replacement runs around $3,000, assuming you’re replacing all of your pipes at once. If you’re just getting a repair to one section for a leak or otherwise, it will obviously be less than that. A number of factors can impact that average, making it cost more or less than what the statewide average is for service.

Does Homeowners Insurance Cover Service Line Repairs?

Some homeowners insurance policies cover leaks, bursts, and other types of water line issues. But most likely, your insurance policy will only cover those issues that occur suddenly or due to an accident – they rarely cover replacements that are needed due to general wear and tear or age.

Check your personal homeowners insurance policy to see what types of water line repairs and replacements you’re covered for.

Replacing a Water Service Pipe in Loudoun County, VA

In Loudoun County, the homeowner is responsible for all of the water lines and plumbing fixtures inside of their own property line. This includes fixtures inside of your home such as the main shutoff valve, hot water heaters, and drains as well as fixtures outside of your home like grinder pumps, meter crocks, and piping.

Remember to always call VA811 at least three days before you dig in your yard, if you plan to do any digging personally.

Line Repairs in Fairfax, VA

In Fairfax, the water meter and its settings are the responsibility of Fairfax Water. Everything from that point to the inside of your property is the responsibility of the homeowner to maintain.

Remember to take proper care of your pipes for the good of yourself and your neighbors. This means being wary of what you’re flushing down the toilet and the drain as well as how you maintain the piping in your property.

Water Service Line Experts in Northern Virginia

Kiddco Plumbing is a full service plumbing repair and replacement company that helps homes and businesses all throughout Northern Virginia including Loudoun County, Fairfax County, and the City of Fairfax, VA. We offer 24/7 emergency services as well. Give us a call to schedule a service today.

How to Unclog a Garbage Disposal

Is Your Garbage Disposal Clogged? Here’s What You Need to Do

Garbage disposals are an excellent tool to have in your home. They can break down food waste which reduces odors. Not only that, but they help the environment by slimming down the amount of waste that ends up in landfills.

A Consumer Reports finding from 2020 showed that nearly half of all Americans have garbage disposals in their sink drains. A clogged drain can lead to the formation of mold and other harmful germs that could cause health issues for your family down the line.

My Garbage Disposal Is Not Draining!

If your garbage disposal is full of water, there are a few things you can do to try to fix it. A few important reminders:

  • Make sure you turn off the breaker that connects to the garbage disposal. You do not want to be electrocuted while trying to fix it.
  • Wear gloves to prevent any damage to your hand from whatever is stuck in the drain. Even if it’s just food waste, you can never be too safe.
  • Don’t stick your hand down the garbage disposal. You’ll be using tools to remove objects if necessary.

How to Unclog a Garbage Disposal

1. Disconnect the Power

Turn off power to the garbage disposal. Every one is different but a licensed plumber should be able to help you find the correct connection if you cannot. If you don’t turn off the correct switch on your breaker you risk electrocution which is a lot worse than a jammed garbage disposal!

2. Remove Water

You can plunge the drain by using a flat plunger to get any standing water out of your sink. Failing that, you could also try scooping the water into a cup or bucket. If you have a lot of water clogging up the drain, Kiddco Plumbing has devices that can remove large quantities of water without causing a mess or damaging your kitchen.

3. Unclog

Wield a flashlight with one hand and shine it into the garbage disposal. Use pliers or tongs to try to remove whatever is causing the blockage. Remember not to stick your hand inside of the drain! You’d rather get a tool stuck in there than risk injury to your fingers. Once the blockage is removed, you can turn the power back on and try running it again.

4. Reset

Still jammed? Try turning the power off to the garbage disposal again and then look under your sink to find the reset button. The reset button is a small red button near the underside of the unit. Turn the power back on and try running it again.

5. Unjam From Underneath

If the unit is still stuck, turn the power off to it once more. You can attempt to unjam the impellers inside of the garbage disposal by getting an allen wrench and inserting it into the hex socket at the underside of the garbage disposal unit. Twist the bolt in both directions to manually move the impellers and free them up. Be careful that you don’t take apart your garbage disposal unit! Otherwise your floor could be covered with water which will lead to more damages.

If you’re still unable to fix your problem or if you’re apprehensive about going through these steps, give Kiddco Plumbing a call. Our experts have decades of experience unclogging garbage disposals throughout the Northern Virginia area. We’ll make sure that the problem doesn’t get worse before it gets better.

How Do I Avoid a Clogged Garbage Disposal?

Ensure that you never encounter this problem in the first place by taking good care of your garbage disposal unit. Here are some things you can remember that will keep your drain line clean in the future.

1. Cold Water

Always run cold water when using your garbage disposal. Hot water can release fats and acids from the food in your disposal. Those fats can clog the drain pipe and release foul odors into your home.

Make sure you don’t run the garbage disposal without running water! That’s even worse than running it with hot water as the water is necessary for the steady flow of food particles through your plumbing system.

2. Routinely Use Your Garbage Disposal

Make sure you don’t let food sit in your garbage disposal for too long without running the unit. First of all, letting food sit in the disposal will attract pests and bugs over time. It could also cause your kitchen to smell like rotting food.

But even if there’s no food in the garbage disposal, make sure to turn on the water and run the unit every couple of days. Your unit will rust or freeze over time if it isn’t used regularly, so just stay in the habit of maintaining it and making sure it’s still working.

3. Avoid Putting These Items In Your Garbage Disposal

Not every bit of food waste is safe for the garbage disposal. Egg shells, potato peels, banana peels, coffee grounds, and other greasy foods can lead to future clogs and should not go in your garbage disposal. You should obviously avoid putting non-food items in there as well. Glass, plastic wrapping, and other materials can’t be ground up properly and will cause major damage to your pipes.

Kiddco Plumbing has decades of experience providing plumbing solutions to families all throughout the Northern Virginia area. We can provide 24/7 emergency services for homes and businesses no matter how difficult your problem may be.

When to Replace a Toilet?

Signs It’s Time to Replace Your Toilet

As the use of mobile devices skyrockets, so does the amount of time people spend on their toilets. And there’s nothing worse than an uncomfortable, or even faulty, social media throne! Toilet problems can vary and knowing when it’s time to replace your toilet might be confusing. From plumbing problems to improving comfort, we’ll share our expertise so you know when to replace your toilet.

Know when to replace a toilet & learn the common reasons for toilet replacements: clogs, leaks, and the toilet’s age.

Depending on the user, the reason to replace one’s toilet varies. However, there are a few key signs that you’re ready for a new toilet. Common reasons to replace a toilet include regular clogs, leaks, discomfort, saving water, and the toilet’s age.

Replace Your Toilet if it Clogs Often

It is not normal for a toilet to experience regular clogging. In fact, it’s likely a sign that you either need a replacement or need a professional to diagnose the issue. A toilet clogging daily or even weekly could be a sign of a bigger problem.

Ignoring a clogging problem might mean risking an even more expensive problem down the line. However, don’t worry about the rare clog. If you can attribute it to a clear source, then the occasional clog is nothing to stress about.

The Toilet is Leaking

If you have any kind of water damage to your walls or the floors around your toilet, you definitely need a toilet replacement. There are endless reasons why a toilet might be leaking water. Many of which you should not attempt to fix yourself. It’s best to call a professional plumber immediately if you see water leaking from your commode.

You Can’t Flush the Toilet

Whether your toilet is always running or not running at all, a toilet that doesn’t flush is useless. The ability to flush is basically the sole reason the toilet was invented. Usually, flushing issues come on slowly and gradually get worse.

When you can catch them early, you can often find a DIY fix. However, you should reach out to a professional for advice if you’ve never heard of a toilet flange, wax ring, or supply line.

The Toilet Bowl is Cracked

Replace a toilet if it has any cracks in the fixture because they will lead to water leaks in the wall and on the floor.
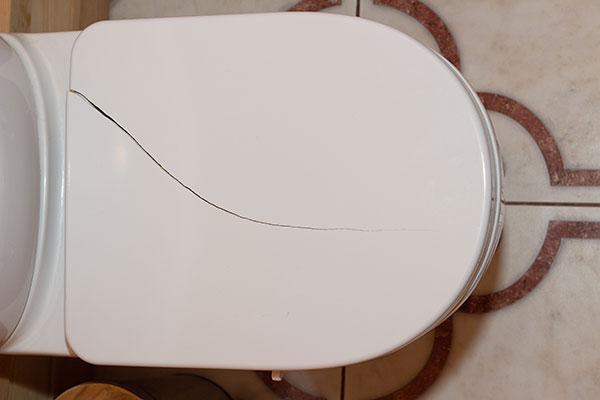
A cracked toilet bowl, tank, or floor seal is the most painfully obvious sign that you need a toilet replacement. Although obvious that it needs fixing, the cracks themselves are not always obvious. Both invisible hairline cracks and discernable cracks will cause water to pool where your toilet meets the floor.

It may not be much at first but be sure to call a professional at the first sight of pooling water. If appropriate, a trained and certified plumber might provide a short-term solution; but eventually, you will need to get a full toilet replacement.

Your Toilet is Old

Toilets are extremely durable and the fixture itself does not need a routine replacement very often. Nevertheless, the inner parts of the toilet wear out more quickly and do require regular maintenance and replacements. The rule of thumb is to replace your porcelain throne every 20 years or so. Nonetheless, depending on how often the toilet is used and its current state, you may need a replacement sooner.

It’s Uncomfortable

Your toilet may not have any of these danger signs and be in perfect working order. But, you still might consider a toilet replacement if you are uncomfortable using it. When a toilet isn’t the right size, it can inhibit blood flow, produce unhealthy habits, or be generally displeasing. You deserve the best.

So, consider a toilet replacement if you’re not happy with your current toilet. Wondering what toilet is the best? We can help you find the best throne for your needs.

Saving Water and Money is Important

When to replace a toilet is often reliant on how much saving money in energy costs. Call Kiddco Plumbing to see how.Some toilets, especially those installed before 1994, are notorious water guzzlers. The vast amount of water that they use is not only bad for the environment but also for your wallet. If you’re thinking your toilet might be a water guzzler, you should consider upgrading to an energy-efficient model.

The EPA estimates that installing WaterSense toilets will save an average family of four approximately $90 per year in water bills. This is one way to conserve the environment and save money with Green Plumbing.

Do You Need a Plumber to Replace a Toilet? Or Can I Do it Myself?

Many home improvement jobs are simple and straightforward. Watch a few YouTube videos, try it out, and it ends fairly well. However, there are some jobs that should be left to a trained and certified professional. A full toilet replacement requires specialized tools, equipment, and above all, knowledge and expertise.

In the best-case scenario, it will probably take you quite a long time. In the worst-case scenario, you might cause long-term damage to your home and its plumbing system. Definitely call a plumber for toilet replacements.

Leesburg Toilet Repair Plumbers

Still not sure if you need a toilet replacement? Our honest plumbers come to your home or business to assess the problem. Together we devise a toilet replacement plan that includes removal, installation, securing, and disposing of your toilet. Call or schedule an appointment today with your neighborhood plumbers at Kiddco Plumbing!